Showing posts with label cooking. Show all posts

Thursday, May 10, 2012

one year old

on tuesday my family and i celebrated frankie girl's first birthday. there was no party, just my two girls and i {and my nan on skype} and a big cake for morning tea. i'm that womens weekly cake book mum. i don't cook much, but when i became a mum, something inside of me urged for a special home made cake to come out for birthday's. did you get novelty cakes as a kid? i did, i distinctly remember having the piano and the dressing table, clearly my favourites, but i'm sure i had others. great memories. and i would love for my kids to have the same sort of memories.

i firstly spotted the pink ombre layer cake on pinterest and i then saw on my instagram feed that jody from lemon rhodes had made one for her little one's 2nd birthday. jody posted her recipe on her blog, so i figured i would give it a try too. why not hey. you can find jody's blog and recipe here {thanks jody}. as always, my cake has a story - almost blew up my mix station and didn't have a supermarket open for supplies due to our public holiday - so i improvised with the icing, mine is just a vienna butter icing, still looks the part, although the raspberry flavoured icing would've been amazing.

it's a big milestone turning one. especially for the parents. what a year frankie's first year has been. she has such character already, summer calls her "the cheekiest baby ever", and that she certainly is. she waves bye bye now, she points her finger at you and puts her head down while doing it {erm... not sure where she gets that from}, she's loud, she's VERY loud, and she's mastered the cool head nod "dancing" when any slight beat hits her ears. this is my favourite of the moment, especially when we're in the car and i have my old skool house music playing. too damn cute.

i'm looking forward to the 12-24 month stage, i think this age is the best!


Wednesday, April 18, 2012

3 ingredient pancake recipe

it's saturday 6am. the mini me's are up and at em'. there's no weetbix in the house. there's no banana's or fruit. the pre-schooler is hungry and doesn't "like" toast. of course. mummy's tired. sigh. mummy sucks it up, takes a breath, puts her happy face on and makes a coffee. actually, the coffee came first. "who wants pancakes" she suggests in a loud fun filled voice. "meeeeeeeeeeeeeeeeeeee"...

the easiest thing to make with the biggest satisfaction ever. 1 cup of self raising flour, 1 cup of milk and 1 egg. combine well and away you cook. get your cookie cutters out and shape them into love hearts. add mayple syrup. and what the heck - add ice-cream too. serve on adorable love mae melamine. eat.

happy kids. happy mummy. happy start to the weekend!

Friday, September 9, 2011

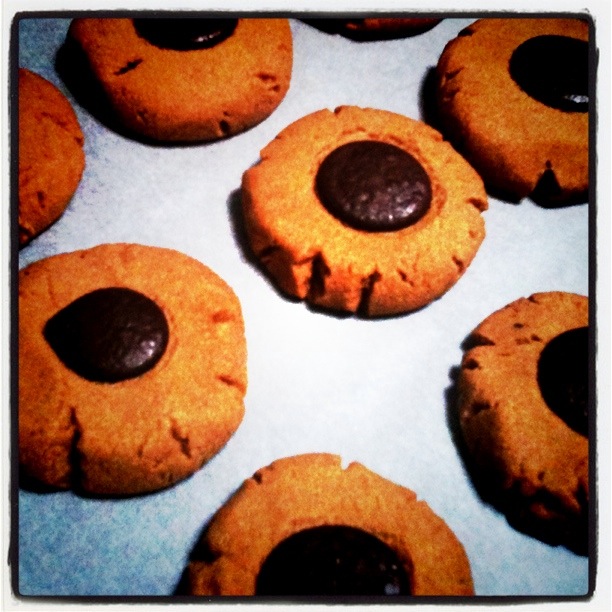
cheap eats : mocha cookies

every 3 or 4 weeks i miss a shop and try and 'get by' on what we have in the cupboards. not only to save a couple of pennies, but also to use up those stray meal base packets hanging around at the back of the shelf, and to even try and get creative with what ingredients we do have. look, i'll be honest with you, it normally ends in a phone call to nan asking what i can make with such and such. but if i'm not calling nan, i normally dig out the cheap eats recipe book {women's weekly}.

this recipe is from that book. be warned, it's not the healthiest of foods and probably not something you would pack in your child's lunch box. but if you're a coffee and biscuit lover, you'll probably love it!

150g butter, softened
3/4 cup {165g} firmly packed brown sugar
1 egg yolk
2 teaspoons instant coffee granules
1 tablespoon hot water
1 1/2 cups {225g} plain flour
1 tablespoon cocoa powder
20 dark chocolate melts

{1} preheat oven to 180/160c fan-forced. grease and line two oven trays with baking paper.

{2} beat butter, sugar, egg yolk and combined coffee and water in small bowl with electric mixer until smooth. transfer mixture to large bowl; stir in sifted flour and cocoa, in two batches. knead dough on floured surface until smooth.

{3} roll level tablespoons of mixture into balls; place 5cm apart on trays, flatten slightly. press 1 chocolate melt into centre of each cookie; bake about 12 minutes. cool cookies on trays.

next time i will use milk chocolate instead of dark chocolate melts, the dark was too much for me. and my oven isn't the best, so my cookies were in there for about 20 minutes.

do you have a favourite 'cheap' meal you like to cook? or a recipe book you use often? does anyone use the 4 ingredients book? i see there is a kids version of that out now too.

Tuesday, September 6, 2011

iphone italk : play-doh

art and craft really isn't one of my strongest mum assets. i'm that mum that draws stick figure people and the two stroke mcdonalds symbol birds on the chalk board. and i'm totally ok with that! when it's play-doh time at our house, it's normally sausages and rissoles that get made by me. but i've stepped it up a knotch thanks to the play-doh iphone app!

sometimes you need to make a morning out of an activity. when i downloaded the play-doh iphone app {free app - search "play-doh"}, i decided we should make some play-doh from scratch, you know, just for fun...

{play dough recipe} combine 2 cups of plain flour, 1 cup of salt, 4 tbs of cream of tartar, 2 tbs of cooking oil and 2 cups of boiling water in a bowl and mix well. add more flour if it's sticky, which i did. section out your dough and colour as your heart desires.

note : when it comes time for the food colouring - wear gloves!

so how the app works is it gives you idea's and instructions on what to make with play-doh, you can take photo's of your creations and share them via email and facebook, you can make your own designs and load and share them, and you can browse play-doh products.

we decided we would make the backpack creation already loaded. it gave me step by step instructions by both pictures and words, and before we knew it, mum was suddenly a play-doh pro. we snapped a photo of it with the iphone {as per below} and we saved it into our play-doh app and we emailed it off to grandma.


i cannot tell you how impressed summer was to see our backpack creation. so impressed that when dad walked in the door, it was THE very first thing she rushed to tell him about. go mum.

Friday, September 10, 2010

jelly slice

i'm not a big fan of cooking. there i said it. i do wish i had urges to cook up something beautiful for the family every day, or at least once a week, but the reality of it is that i just have little love for cooking and for the kitchen. maybe one day that will change forever. i hope it does.

so when my partner saw me dig out some of mum's old recipes and proudly place the jelly slice recipe on the bench, he laughed. i laughed too. it was kinda funny. but i did it, i made the slice, and it was yummo, so i thought i would share my jelly slice with you too!

what you will need :

2 jellies (3 cups of water) + 1/2 tsp gelatine

1 1/2 packets of milk coffee biscuits
270g butter

1 tbsp gelatine
1/2 cup of boiling water

2 tins condensed milk
1/4 cup lemon juice

make the jelly {i used port wine, yum} with 2 cups of boiling water, stirring until the jelly crystals are dissolved. dissolve gelatine in a further 200ml of boiling water then add to the jelly. stir in together and place in fridge and let set slightly.

crumb the biscuits. i done it the old skool way and put my biscuits in a few layers of freezer bags and smashed the bejeezes out them. found it great for a bit of stress relief. they don't have to be crumbed to minute pieces, but if there are chunky bits, the butter wont stick it together. then add melted butter to the crumbed biscuits. combine well then press into base of a tin {lamington size}. place in fridge to set {i cheated and put mine in the freezer for about 15 minutes}.

combine gelatine with boiling water, stirring until dissolved. add to condensed milk and stir until well combined then add the lemon juice.

once the base is set, pour milk mixture over and let set together {about 30 minutes in the fridge}.

pour jelly on top to make the top layer {keep an eye on your jelly and don't let it set before this stage}, then leave in the fridge until set.

and that's that. jelly slice done. did your mum ever make jelly slice? do you make it now?